Hexagons, Continued
We're ready to continue stitching the hexagon, using color #2. Prepare your thread as always. Skip one horizontal row of floats above your last row of stitches. Pick up the float directly in the center above your last row of stitching as shown below:

Ok, here's the only tricky part in this entire design, and it's not really that hard. For this row of stitches you are going to stitch through the same four floats you used before with color #1, so be gentle as you do not want the floats to break or become too stretched out.
Move down and skip the same horizontal row of floats and pick up the same four floats to the left that you used for color #1 as shown in the image above.
Keep repeating this series of stitches all the way across the left side of the fabric:
At the end of the row, pick up the last float and draw your needle through to the back side as you did for every row before.
Now turn your work (safety pin at the top), thread your needle again, and work from the middle to the left side in the same way.
Next Rows
Have you figured out what we're doing with color #2? We're building the mirror image of the bottom of the hexagon. So the next rows of stitching with color #2 will look like this:
 |
| Row 2 |
 |
| Row 3 |
 |
| Row 4 |
On the other end of the towel, the end that will be hidden when it's folded, I made only one row of hexagons and finished with the same two rows of straight stitching that we began with:
I would recommend that you keep it simple for a kitchen towel -- maybe just two rows of hexagons for the front and one row of hexagons for the back. Remember, this towel is probably going to get tomato sauce on it at some point and you don't want to cry over stains on your beautiful handiwork.
Finishing
Now you are ready to hem your towel on all sides. The most pressing issue here is to keep your work secure and keep the ends from fraying. Here's what I do. I use Fray Check on the extra thread and fabric on the back of my towel.
 |
| Be a bit generous with the Fray Check. Be sure it soaks the fabric and the thread a bit. |
The thread pictured above is about 1/4" long. You can actually trim it a little closer than that. We are going to hem the side by turning the selvage over the loose threads as a binding. So be sure that the threads don't peek under the hem. This will be a narrow hem and the width will depend on the width of your selvage.
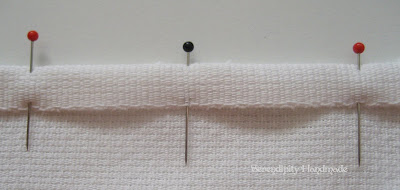
Pin your hem and catch your threads in the hem:
Sew the hem with two rows of stitching about 1/4" apart. You want to secure the ends of the pearl cotton really well so your design will not unravel, so get as close to the bottom edge of the hem as possible. It's a little tough to see in the photo below because the stitching is white-on-white, but if you look closely you'll see what I mean:
Finally, turn up your hem on the bottom of the towel. You get to decide how narrow or wide your hem will be. My hem is about 5/8" deep:
Et voilà! You are done!
Give your beautiful towel as a gift, or hang it proudly in your bathroom or kitchen.
Questions and comments on this tutorial are always welcome. Happy stitching!


This is really nice! I love the shades of pink. I will email you with the pattern/tuto info :)
ReplyDeleteThis looks lovely Collette! Wonderful tutorial!
ReplyDeleteThank you kindly for taking the time to do such a wonderful detailed tutorial. In the past I tried learn via a few websites but found I had more questions than answers. Your instruction was perfect!
ReplyDeleteThank you so much I found the 2nd part
ReplyDeleteCatherine
I like the idea of using the Fray Check. I usually sew the thread down first then go back and sew all the way down the side. This is better - thanks.
ReplyDeletebeulahdg@gmail.com
So glad my method will work out better for you! :)
DeleteYour tutorial is the best that I have seen! AWESOME! I am doing a placemat and I want to use the pattern above, but not very sure where to begin the first stitch. Do I use the cross stitch centering method? I have already hemmed the edges. Please help, because I am so anxious to get started on it. Email is: garnetbaby0118@gmail.com
ReplyDeleteThank you so much! Sending you an email now.
Delete