Monday, August 29, 2011

Swedish Weaving Vintage Towel Tutorial - Part Two


This is part two of the tutorial.   If you've landed on this page for the first time, start with the introductory post and then read part one of this tutorial to get started!

Hexagons, Continued

We're ready to continue stitching the hexagon, using color #2.  Prepare your thread as always.  Skip one horizontal row of floats above your last row of stitches.   Pick up the float directly in the center above your last row of stitching as shown below:


Ok, here's the only tricky part in this entire design, and it's not really that hard.  For this row of stitches you are going to stitch through the same four floats you used before with color #1, so be gentle as you do not want the floats to break or become too stretched out.

Move down and skip the same horizontal row of floats and pick up the same four floats to the left that you used for color #1 as shown in the image above.


Keep repeating this series of stitches all the way across the left side of the fabric:  


At the end of the row, pick up the last float and draw your needle through to the back side as you did for every row before.

Now turn your work (safety pin at the top), thread your needle again, and work from the middle to the left side in the same way.


Next Rows

Have you figured out what we're doing with color #2?  We're building the mirror image of the bottom of the hexagon.  So the next rows of stitching with color #2 will look like this:

Row 2

Row 3

Row 4
Great!  You've completed a row of hexagons.  Decide how many rows  you want to complete.  The towel that I made has three complete rows of hexagons on one end of the towel.  This is the side that will face front when it is folded or hung up.

On the other end of the towel, the end that will be hidden when it's folded, I made only one row of hexagons and finished with the same two rows of straight stitching that we began with:


I would recommend that you keep it simple for a kitchen towel -- maybe just  two rows of hexagons for the front and one row of hexagons  for the back.  Remember, this  towel is probably going to get tomato sauce on it at some point and you don't want to cry over stains on your beautiful handiwork.

Finishing


Now you are ready to hem your towel on all sides.  The most pressing issue here is to keep your work secure and keep the ends from fraying.  Here's what I do. I use Fray Check on the extra thread and fabric on the back of my towel.


Be a bit generous with the Fray Check.  Be sure it soaks the fabric and the thread a bit.
Let the Fray Check dry for about 20-30 minutes.  When it is dry, the thread will be stiff (and so will the fabric).  Trim the thread close to the edge of the selvage:


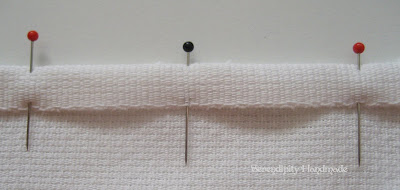
The thread pictured above is about 1/4" long.  You can actually trim it a little closer than that.  We are going to hem the side by turning the selvage over the loose threads as a binding.  So be sure that the threads don't peek under the hem.  This will be a narrow hem and the width will depend on the width of your selvage.

Pin your hem and catch your threads in the hem:


Sew the hem with two rows of stitching about 1/4" apart.  You want to secure the ends of the pearl cotton really well so your design will not unravel, so get as close to the bottom edge of the hem as possible.  It's a little tough to see in the photo below because the stitching is white-on-white, but if you look closely you'll see what I mean:


Finally, turn up your hem on the bottom of the towel.  You get to decide how narrow or wide your hem will be.  My hem is about 5/8" deep:


Et voilĂ !  You are done!


Give your beautiful towel as a gift, or hang it proudly in your bathroom or kitchen.

Questions and comments on this tutorial are always welcome.  Happy stitching!

Wednesday, August 24, 2011

Swedish Weaving Vintage Towel Tutorial - Part One


In the introductory post I pointed to some background materials to help you learn more about Swedish weaving techniques before we get started, and told you what materials you will need to complete one kitchen or guest towel.

At this point your fabric or ready-made towel should be washed and dried.  On huck toweling fabric be sure to serge or zig zag around the edges to prevent fraying.  Let's get started!

Our Design / Pattern

This is a geometric repeat pattern of hexagons.  We are going to work this on just one side of the towel.


First Steps

Prepare your thread.  Start with the darker of the two hues (color #1) if you are using the same color, as I am above.  I recommend wrapping your skein of pearl cotton around something (such as an empty paper towel cardboard roll) to keep it tangle-free:

Boo-boo Kitty helps hold my thread

Fold your huck toweling lengthwise, selvage to selvage, to find the center:


Open it up, and place a safety pin through one float in the center crease about two inches above the bottom edge, or wherever you would like your design to start.  Be sure to leave at least an inch free so you can hem the bottom:


Measuring your thread

Most designs are worked right to left, beginning in the center, and then worked from the center toward the other end.  That's what we are going to do.  Recommendations as to how much thread to use will vary from pattern to pattern.  The most important issue is not to run out of thread  before you complete a row!  

The standard way to measure your thread is to use 2 1/2 times the width of the towel.  For this simple pattern, 2 1/2 times will leave too much extra thread at the ends.  We are going to measure 2 times the width of the towel, and that will still leave ample thread at the ends.  

Some of you will have a 15" wide fabric, some 16", and some may have a 17" wide fabric.  Measure a length of thread from selvage to selvage twice.  Your thread will be anywhere from 30 to 34 inches long.  


When you are more experienced you can experiment and figure out just how much thread you really need so you're not wasting too much on the ends.

Thread your needle with the darker of the two hues (color #1).  We're going to start stitching in the row just above the safety pin mark where I have inserted the needle below:


Next Steps:  Straight Stitching

I know that we are simply going to make a straight line on stitches across the bottom, but we're going to start in the middle to make sure we have enough thread for the entire row.  Starting in the exact middle also ensures that our design will be the same (mirror images) on both sides. 


Pass your needle through the float on the left directly above the safety pin.  Even up the two sides of your thread as shown below so that you have equal amounts of thread on either side of the float:


This is what you will do for each and every row.

We always work from right to left in every row, and in every row we will start in the middle of the fabric. Once you have more experience with this pattern you may be able to work it from right to left without starting in the middle, but begin in the middle for starters and save yourself some frustration, ok?

Now make your first stitch, moving from the middle crease to the left.  Pick up each and every float in the row.  This is called straight stitching:

Looks like a running stitch, doesn't it?

Be careful not to pull the thread too tight or you will end up with less thread on one side and your stitches won't look even. Try not to pull the floats out of shape.

Continue until you reach the end of the row.  To finish a row, there is the option of weaving your thread back through a few floats at the end and then cutting your thread close to your work.  I  prefer drawing my needle to the backside at the beginning of the selvage like this:


Your finished half row will look like this:


Don't worry if it's not perfectly lined up with the selvage edge every time you end a row.  If you're a few millimeters off it's no big deal.  No one will notice. 

I'll show you how to anchor your threads when we finish the towel.

Now turn your work so your safety pin is at the top of your towel, and your finished line of stitching is on the right.  


In Swedish weaving you'll often work the second half of the pattern upside down, so to speak.  This is not a big deal because in general the motifs (in this case, a hexagon) are simply repeated over and over again across the width or length of the fabric. 

Continue to straight stitch through every float on the left side.  Finish by pulling your thread to the back side and removing the needle.  Leave the extra thread right where it is.  Don't knot it or pull at it. 


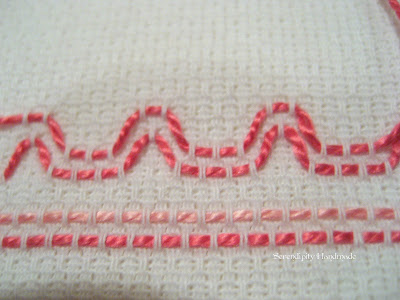
Now thread your needle with your other color choice (color #2) and repeat the steps above in the next row above your first line of stitching.  When done, you will have two rows of straight stitches, one on top of the other:


Start of the Hexagons

From here on out I'm going to assume that you have prepared your thread as shown above.  Use the darker of two hues (color #1) for the bottom of the first hexagon.

In the following pictures I moved my safety pin down a few rows so don't be distracted by its position.

The bottom of the hexagon is formed by four straight stitches.  As we are starting in the exact middle of the design, pick up two floats on the left to begin the first hexagon. That ensures that we have a mirror image of the design on both sides.


Move up and skip one horizontal row of floats, and pick up one float to the left of your original stitches as shown below:


For the next stitch, move down and skip the same horizontal row of floats and pick up four floats to the left.  Keep repeating these stitches all the way across the left side of the fabric:
The little "hills" that you are making, where the thread is
closed at the top and open at the bottom are called "open loops"


At the end of the row, pick up the last float and draw your needle through to the back side as you did before.

Now turn your work (safety pin at the top), thread your needle again, and work from the middle to the left side in the same way.

For the next row, take a closer look at the design.  We're still going to use color #1 for the next three rows (for a total of four rows):


In the next row you will pick up three floats to form the bottom of the hexagon, and pick up two floats to form the top of the open loop:


Continue to the end of the left side and finish as usual.  Turn your work (safety pin on top), thread your needle with the rest of the thread and continue working from the middle to the left.  This is what working from the middle to the left looks like when you've turned your towel with the safety pin on top:


Everything is just upside down.  The hexagons are formed by a series of straight stitches and open loops.  

Easy, right?  Simply refer to the pattern picture above to continue with color #1 in the same manner until you have four rows of color #1 to form the base of your hexagons.  It will look like four wavy lines:


Ok, that's enough for today.  Feel free to ask questions by commenting below.  We'll continue in the next installment!

Monday, August 22, 2011

Swedish Weaving Vintage Towel Tutorial - Introduction


We're going to make a vintage-style kitchen or hand towel using the Swedish weaving (a.k.a. "huck embroidery," "huck weaving," or more rarely, "huck darning") technique.  This style of embroidery was very popular in the 1930s and 1940s and was often used to make kitchen towels using a type of material known as "huck toweling" or "huckaback."

You can also make lovely guest towels for the bathroom, especially if you decide to use a more intricate design and you'd rather not risk ruining it in the kitchen.  Swedish weaving is incredibly easy to do and the results are impressive.  A couple of towels make great gifts for the holidays!

Some Background Information

You'll have to do a little studying before we get started! This will help you better understand the type of fabric we're using and the technique.  If you have a copy of Reader's Digest Complete Guide to Needlework there is a great four page section on huck embroidery that I highly recommend. (In the 1979 edition it starts on page 70).

Otherwise, take a look at this short FAQ about the different types of even-weave fabric that can be embroidered and shows some stitching techniques.

You may also want to look at the diagrams for a couple of free patterns:

Materials


  • Huck toweling cut to 22" long, or a ready-made towel*
  • Two skeins DMC pearl cotton #5 embroidery thread in two complementary colors
  • A blunt-tipped tapestry needle
  • A pattern, diagram, or a vintage towel to copy
The particular pattern that we are going to use is so simple that you do not need to count rows or read a pattern, you just have to count the number of floats to pass your needle through.  In fact, if you can count the number of floats in a photo of a pattern (as we will do) or count the floats on an existing vintage towel you can actually copy the design.

*About Huck Toweling*

You'll want to purchase huck toweling, known as huckaback outside of the US, for this project. It is a cotton fabric woven in 15" to 17" widths.  It has 9 rows per inch (9 count) and  is woven with vertical loops on one side, and horizontal loops on the other side:

The floats as picked up by a needle

You can work both sides of the fabric, but we are only going to work the side with the vertical loops, also known as "floats."

Huck toweling is most often available in white, and it is not that easy to find, at least in my neck of the woods.  Usually an entire bolt must be ordered from a fabric supplier or craft store. Unless you have friends that want to join you in this project and split the cost of a bolt, I would scour the web for a supplier who will provide it in smaller quantities, or simply buy a ready-made towel. Easy.

My huck toweling came in a 16" width from selvage to selvage.  I cut it to 22" long. One-and-one-half yards of toweling cut apart into two 22" lengths will make two kitchen towels.

To prepare huck toweling it is best to wash and dry it before use.  This helps puff up the floats so you can see them more easily.  Serge or zig-zag along the cut edge to keep them from fraying while you work.

Ok, we have our equipment and some general knowledge about the Swedish weaving technique.  In our next installment we'll get started!

Saturday, August 20, 2011

Swedish Weaving / Huck Embroidery Tutorial Coming This Week

 
I'm almost done with the towel I first began in June; I only need to finish the edges.  I actually put it aside for a while until I had time to complete it while photographing the steps.  Reader Susan mentioned that she'd be interested in a tutorial, and I suppose that others may be interested as well.  The first part begins on Monday.

Wouldn't my towel be the perfect addition to my fantasy 1940s kitchen?


 Or perhaps it could be a guest towel in my fantasy 1940s bathroom?


Can you tell I like pink?  (smile)


Images courtesy Mid-Century Home Styles.

Monday, August 15, 2011

Saturday, August 13, 2011

Giveaway Winner + Some Embroidery Transfers

As you may know, lucky reader Jane guessed what I did on my summer vacation:  I spent some time in  Belfast, Northern Ireland, and also went to Dublin, Ireland.  I suspect that she may have used her super library-sleuthing skills to find an answer fast!  Jane has won a copy of McCall's 3979, vintage-style aprons:

Image courtesy of McCalls.com

But take heart, dear readers,  I scoured the web for a couple of embroidery patterns that celebrate all things Celtic and Irish as a consolation prize for you.  Click on the links below the images to access the patterns.

First, you can generate free cross stitch charts for names and phrases in a Celtic-style type at Celtic Cross Stitch.

A Celtic cross by Mary Corbet:

Celtic Cross PDF Pattern

And finally here is a darling embroidery pattern by Corinne of so september:

She Scatters Shamrocks Pattern

If all goes well, next week will bring some new changes to the look of the blog, so there may be some intermittent times that the blog is unavailable. Hopefully that will not happen, but I wanted to give you some notice.

I hope that you are all having a wonderful weekend and I'll see you here for Madison Avenue Monday next week!

Thursday, August 11, 2011

What I Did on My Summer Vacation + Giveaway

I'm back from my summer vacation and had a really good time. Dear readers, can you guess where I was?


The first person to comment with the two correct major cities and country shown in the pictures above will win a little prize, in honor of my 2 year blogoversary (which was two days ago!).  Contest ends with the first correct entry.  Who knows, the correct answer may appear in minutes!  Though this contest may be a little tougher than you think....good luck!